Overview
Ubuntu is a Linux distribution based on Debian and composed mostly of free and open-source software. Ubuntu is officially released in three editions: Desktop, Server, and Core for Internet of things devices and robots. All the editions can run on the computer alone, or in a virtual machine.
For the purposes of this instruction, the focus will be on installing Ubuntu 22.04 LTS Server which is a headless (does not have a GUI) version to host various applications and will be hosted on VMWare Workstation/eXSI hypervisors.
Note that specific tooling has may not be compatible with recent releases of the Ubuntu OS, therefore check dependencies of your tooling before choosing a version of Ubuntu Server to install.
Hardware Dependencies
| CPU | RAM | Disk |
|---|---|---|
| 1+ | 1+ | 2.5GB+ |
Installing Ubuntu 22.04 LTS (Server) on VMWare Workstation
- Download the .ISO file from Ubuntu.
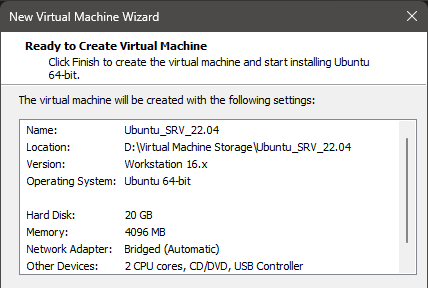
- Create a new virtual machine within VMWare Workstation, ensuring the following options are chosen or set:
- ISO Disk: Point to recently downloaded .ISO image for Ubuntu
- Set appropriate resources for the machine and set network adapter
![VMware Configuration VMware Configuration]()
- Once resources have been allocated to the VM, you can then proceed through the Ubuntu Server install wizard, selecting the appropriate selections. Highlighted below are a few unique selections with further information, however selecting the defaults will result in a fully function server being created so select those if nothing additional is required. Ensure you note down the username and password set during the wizard.
- Install Type: New choice available with Ubuntu 22.04, select default selection (Ubuntu Server).
- Network Connections: If the VM was configured to have connectivity in the previous resource allocation, you can select the adapter and set either DHCP (default) or a static address for the server to utilize.
- Proxy: Enter the proxy details if the server will sit behind one, this can also be updated post the install if you wish not to configure this just yet. However, if you’re using something like Squid, you can input
http://<IP>:>port>to route traffic through the proxy during and after the installation. - Open SSH: Enable if you will be accessing this server via SSH. Its recommended to enable this as accessing the server through the VMWare Workstation terminal can be annoying. However, keep in mind that this will need to be hardened or secured as necessary. See Source 2 for 10 tips for hardening SSH. This, along with proxy details can be configured post installation.
- Reboot when prompted and unmount the .ISO file from the Virtual-CDROM
Once rebooted, access the server using the username and password you set during the installation wizard and run an basic update before creating a snapshot or beginning to install your desired server tools.
1
sudo apt-get update && sudo apt-get upgrade && sudo apt autoremove

